
If you’ve ever wondered how to replace a garage door torsion spring safely, you’re in the right place! We’ve got you covered with easy-to-follow steps and essential tips to ensure a smooth and secure replacement process. So put on your DIY hat and let’s dive in!
Now, you might be wondering why it’s crucial to replace a garage door torsion spring safely. Well, these springs are under tremendous tension and can be dangerous if mishandled. That’s why it’s essential to follow proper precautions and procedures to avoid any accidents.
In this guide, we’ll walk you through each step, breaking it down into simple, easy-to-understand instructions. From understanding the different types of torsion springs to gathering the necessary tools, you’ll be equipped with everything you need to successfully replace your garage door torsion spring like a pro. So, let’s get started and make your garage door as good as new!
1. Disconnect the power and secure the door in the open position.
2. Release tension from the old spring using winding bars.
3. Remove the old spring and install the new one, winding it tightly.
4. Test the new spring’s tension and ensure it’s properly balanced.
5. Reconnect the power and test the door’s functionality.
Remember to always prioritize safety and consider seeking professional help if unsure. Stay safe and enjoy your smoothly-operating garage door!
How to Replace a Garage Door Torsion Spring Safely: A Step-by-Step Guide
Replacing a garage door torsion spring may seem like a daunting task, but with the right knowledge and precautions, it can be done safely and efficiently. In this article, we will provide you with a comprehensive guide on how to replace a garage door torsion spring, ensuring your safety throughout the process. From understanding the components to the steps involved, we’ve got you covered.
An Introduction to Garage Door Torsion Springs
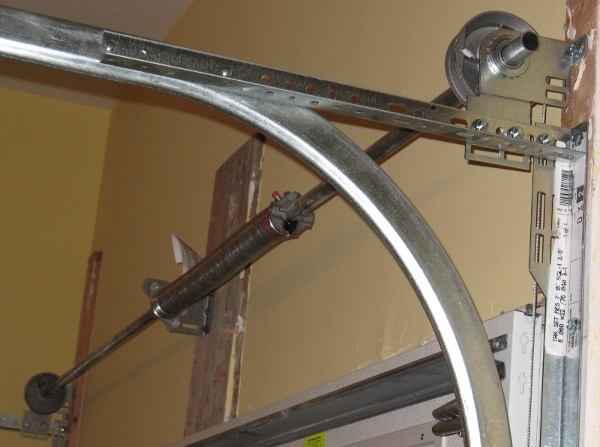
Before diving into the details of replacing a garage door torsion spring, let’s take a moment to understand what it is and why it is an essential component of your garage door system. A torsion spring is a tightly wound metal spring that counterbalances the weight of a garage door, allowing it to open and close smoothly. It is typically mounted above the garage door on a metal shaft.
1. Understanding the Basics of Garage Door Torsion Springs
Garage door torsion springs come in different sizes and strengths, depending on the weight of the garage door. It is crucial to identify the correct size and type of spring for your specific door. Consult your garage door manufacturer’s manual or seek professional advice to ensure you have the right replacement spring.
When replacing a torsion spring, always work with a partner for added safety. Before starting the process, make sure to gather all the necessary tools and equipment, including winding bars, a socket wrench, and safety goggles. Now, let’s move on to the step-by-step process of replacing a garage door torsion spring safely.
2. How to Replace a Garage Door Torsion Spring Safely
Step 1: Ensure Safety Measures
Before working on your garage door, disconnect the power supply and disable the automatic opener. This will prevent any accidental activation of the door during the replacement process. Wear safety goggles and gloves to protect yourself from any potential injuries.
Step 2: Release Tension from the Existing Spring
To release tension from the existing spring, insert winding bars into the winding cone. Be cautious and turn the winding cone slowly, unwinding the spring until all tension has been released. Repeat this process for the other side of the spring.
Step 3: Remove the Old Spring
Once the tension has been released, carefully disconnect the spring from the center bracket and the end bracket. Use a socket wrench to remove the bolts connecting the spring to the torsion shaft. Slowly lower the spring and remove it from the garage door assembly.
Step 4: Install the New Spring
Attach the new spring to the torsion shaft using the necessary hardware provided. Ensure that the spring is properly aligned and centered on the shaft. Slide the spring onto the shaft, securing it with the end bracket and center bracket.
Step 5: Wind the New Spring
Using the winding bars, slowly wind the new spring tension in the opposite direction to the previous step. Make sure to follow the specific instructions provided by the manufacturer regarding the number of turns required for your garage door’s weight.
Step 6: Test the Door
Once the new spring is properly tensioned, re-engage the automatic opener and test the garage door’s functionality. Open and close the door several times to ensure smooth operation. If any issues persist, seek professional assistance to avoid further complications.
Safety Precautions and Tips for Replacing a Garage Door Torsion Spring
Replacing a garage door torsion spring can be hazardous if not done correctly. Here are some essential safety precautions and tips to keep in mind:
1. Seek Professional Help if Uncertain
If you’re unsure about your DIY skills or lack the necessary tools, it’s best to consult a professional garage door technician. They have the experience and knowledge to replace the torsion spring safely and efficiently.
2. Do Not Overwind the Springs
Overwinding the springs can lead to excessive tension and potential damage to your garage door. Always follow the manufacturer’s instructions regarding the number of turns required for the specific weight of your door.
3. Use Proper Safety Gear
Wear safety goggles, gloves, and ensure you have a steady ladder or platform to work on. Garage door torsion springs are under high tension and can cause serious injuries if mishandled.
Frequently Asked Questions about Garage Door Torsion Spring Replacement
1. Can I replace a garage door torsion spring by myself?
While it is possible to replace a garage door torsion spring as a DIY project, it is highly recommended to seek professional help if you’re unfamiliar with the process or don’t have the necessary tools.
2. How often should I replace my garage door torsion spring?
On average, garage door torsion springs have a lifespan of about 10,000 cycles, which translates to roughly 7-12 years. However, the lifespan can vary depending on usage and maintenance.
3. What are the signs of a worn-out torsion spring?
Some common signs of a worn-out torsion spring include excessive noise during operation, difficulty opening or closing the garage door, and visible gaps or separation in the spring coils.
Conclusion
Replacing a garage door torsion spring safely requires careful planning, the right tools, and a good understanding of the process. By following the step-by-step guide and adhering to safety precautions, you can successfully replace a garage door torsion spring and ensure the continued smooth operation of your garage door. If you are unsure or uncomfortable with the process, it is always best to consult a professional to avoid any potential injuries or further damage to your garage door system.
Key Takeaways: How to Replace a Garage Door Torsion Spring Safely?
- Always work with a partner when replacing a garage door torsion spring.
- Wear safety goggles, gloves, and closed-toe shoes to protect yourself from potential injuries.
- Use winding bars to release the tension from the old spring before removing it.
- Install the new torsion spring following the manufacturer’s instructions.
- Test the garage door’s operation after replacing the spring to ensure it functions properly.
Frequently Asked Questions
When it comes to replacing a garage door torsion spring safely, many homeowners have questions. To help you navigate this task with confidence, we’ve compiled a list of frequently asked questions and their answers below.
Q: What safety precautions should I take before replacing a garage door torsion spring?
Before replacing a garage door torsion spring, it’s essential to prioritize safety. Start by disconnecting the power to the garage door opener and ensuring that the door is fully closed. Wearing protective gear, such as safety glasses and gloves, is also crucial. Additionally, be cautious of the tension in the spring and avoid disconnecting or adjusting it without proper knowledge.
It’s recommended to follow a step-by-step guide for replacing garage door torsion springs, as this will outline specific safety precautions for your particular model. It’s important to exercise caution and not rush the process to ensure your safety and the longevity of your garage door.
Q: Can I replace a garage door torsion spring by myself, or should I hire a professional?
While it’s possible to replace a garage door torsion spring yourself, it’s important to evaluate your own capabilities and the complexity of the task. Replacing a garage door torsion spring requires specialized knowledge and tools, making it a challenging job for those without experience.
If you’re confident in your skills and have prior experience, you may feel comfortable tackling the job yourself. However, for most homeowners, it’s recommended to hire a professional garage door technician. This ensures the job is done accurately and reduces the risk of injury, as garage door torsion springs are under high tension and can be extremely dangerous if mishandled.
Q: How often should garage door torsion springs be replaced?
The lifespan of a garage door torsion spring depends on several factors, including usage and maintenance. Typically, torsion springs have a lifespan of around 10,000 cycles, equivalent to approximately 7-10 years, with regular use.
However, it’s important to note that springs may wear out more quickly if they’re exposed to harsh weather conditions or if the garage door is frequently opened and closed. It’s recommended to visually inspect the springs annually for signs of wear and to hire a professional if you notice any issues like rust, fraying, or gaps in the coils.
Q: Can I replace just one garage door torsion spring, or should I replace both?
When it comes to replacing garage door torsion springs, it’s generally recommended to replace both springs at the same time, even if only one has broken. This is because torsion springs tend to wear down at a similar rate.
If one spring breaks and you only replace that one, it can put an uneven amount of strain on the new spring, causing it to wear out more quickly. Replacing both springs together helps maintain balance and equal distribution of weight, prolonging the lifespan of the springs and ensuring optimal performance of your garage door.
Q: Can I use any type of garage door torsion spring, or do I need a specific one?
It’s crucial to use the correct type of garage door torsion spring for your specific door. Torsion springs come in various sizes, wire diameters, and lengths, customized to the weight and height of the garage door.
Using the wrong type of spring can lead to imbalances, improper functioning of the door, and potential safety hazards. It’s recommended to consult the garage door manufacturer or a professional technician who can assist you in determining the appropriate torsion spring for your garage door’s specifications.

Summary
Replacing a garage door torsion spring can be done safely by following a few important steps. First, gather the necessary tools and materials, such as safety glasses and winding bars. Then, release the tension in the old spring and remove it from the torsion tube. Next, install the new spring and wind it carefully using the winding bars. Finally, test the door to ensure it is working properly before using it again.
It’s important to remember that replacing a torsion spring can be dangerous if not done correctly. Always prioritize safety and consider hiring a professional if you are unsure or uncomfortable with the process.